


Docker私有镜像仓库harbor搭建
Harbor介绍
Docker容器应用的开发和运行离不开可靠的镜像管理,虽然Docker官方也提供了公共的镜像仓库,但是从安全和效率等方面考虑,部署我们私有环境内的Registry也是非常必要的。Harbor是由VMware公司开源的企业级的Docker Registry管理项目,它包括权限管理(RBAC)、LDAP、日志审核、管理界面、自我注册、镜像复制和中文支持等功能。
官网地址:https://github.com/goharbor/harbor
实验环境:
安装harbor的机器,主机名设置成harbor
机器需要的内存至少要2G,我分配的是4G
机器ip:192.168.40.181
4vCPU/4G内存/100G硬盘
18.1 为Harbor自签发证书
[root@192 ~]# hostnamectl set-hostname harbor && bash
[root@harbor ~]# mkdir /data/ssl -p
[root@harbor ~]# cd /data/ssl/
生成ca证书:
openssl genrsa -out ca.key 3072
#生成一个3072位的key,也就是私钥
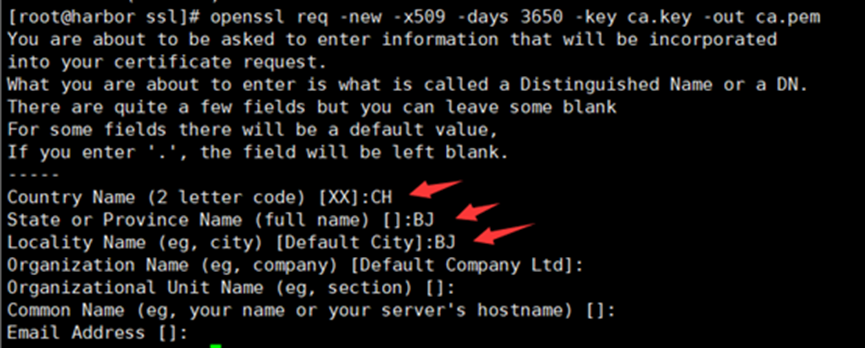
openssl req -new -x509 -days 3650 -key ca.key -out ca.pem
#生成一个数字证书ca.pem,3650表示证书的有效时间是3年,按箭头提示填写即可,没有箭头标注的为空:
生成域名的证书:
openssl genrsa -out harbor.key 3072
#生成一个3072位的key,也就是私钥
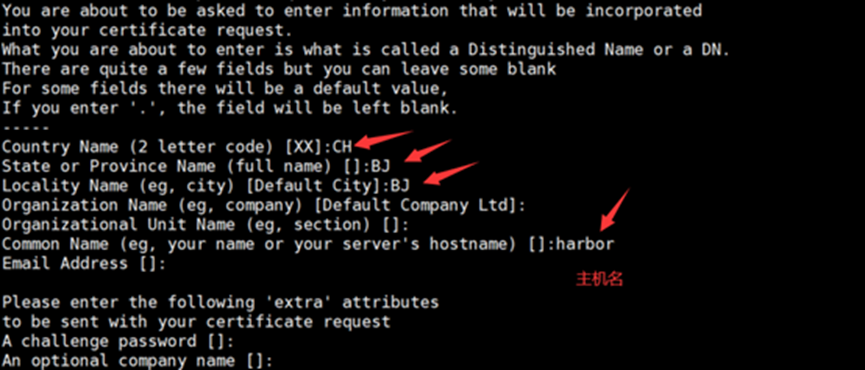
openssl req -new -key harbor.key -out harbor.csr
#生成一个证书请求,一会签发证书时需要的,标箭头的按提示填写,没有箭头标注的为空:
签发证书:
openssl x509 -req -in harbor.csr -CA ca.pem -CAkey ca.key -CAcreateserial -out harbor.pem -days 3650
显示如下,说明证书签发好了:

18.2 安装Harbor
18.2.1 安装Docker
关闭防火墙
[root@ harbor~]# systemctl stop firewalld && systemctl disable firewalld
关闭iptables防火墙
[root@ harbor~]# yum install iptables-services -y #安装iptables
禁用iptables
root@ harbor~]# service iptables stop && systemctl disable iptables
清空防火墙规则
[root@ harbor~]# iptables -F
关闭selinux
[root@ harbor~]# setenforce 0
[root@harbor~]# sed -i 's/SELINUX=enforcing/SELINUX=disabled/g' /etc/selinux/config
注意:修改selinux配置文件之后,重启机器,selinux才能永久生效
#配置时间同步
[root@harbor~]# yum install -y ntp ntpdate
[root@xianchaomaster1 ~]# ntpdate cn.pool.ntp.org
#编写计划任务
[root@harbor~]# crontab -e
* */1 * * * /usr/sbin/ntpdate cn.pool.ntp.org
重启crond服务使配置生效:
[root@xianchaomaster1 ~]# systemctl restart crond
配置hosts文件
[root@xianchaomaster1 ~]# cat /etc/hosts
127.0.0.1 localhost localhost.localdomain localhost4 localhost4.localdomain4
::1 localhost localhost.localdomain localhost6 localhost6.localdomain6
192.168.40.180 xianchaomaster1
192.168.40.181 harbor
[root@harbor harbor]# cat /etc/hosts
127.0.0.1 localhost localhost.localdomain localhost4 localhost4.localdomain4
::1 localhost localhost.localdomain localhost6 localhost6.localdomain6
192.168.40.180 xianchaomaster1
192.168.40.181 harbor
安装基础软件包
[root@ harbor~]# yum install -y wget net-tools nfs-utils lrzsz gcc gcc-c++ make cmake libxml2-devel openssl-devel curl curl-devel unzip sudo ntp libaio-devel wget vim ncurses-devel autoconf automake zlib-devel python-devel epel-release openssh-server socat ipvsadm conntrack
#安装docker-ce
配置docker-ce国内yum源(阿里云)
yum -y install yum-utils
[root@ harbor~]# yum-config-manager --add-repo http://mirrors.aliyun.com/docker-ce/linux/centos/docker-ce.repo
安装docker依赖包
[root@ harbor~]# yum install -y yum-utils device-mapper-persistent-data lvm2
安装docker-ce
[root@ harbor~]# yum install docker-ce -y
#启动docker服务
[root@ harbor~]# systemctl start docker && systemctl enable docker
[root@ harbor~]# systemctl status docker
● docker.service - Docker Application Container Engine
Loaded: loaded (/usr/lib/systemd/system/docker.service; enabled; vendor preset: disabled)
Active: active (running) since Thu 2021-07-01 21:29:18 CST; 30s ago
Docs: https://docs.docker.com
看到running,表示docker正常运行
#查看Docker 版本信息
[root@ harbor~]# docker version
18.2.2 开启包转发功能和修改内核参数
内核参数修改:br_netfilter模块用于将桥接流量转发至iptables链,br_netfilter内核参数需要开启转发。
[root@ harbor~]# modprobe br_netfilter
[root@ harbor~]# cat > /etc/sysctl.d/docker.conf <<EOF
net.bridge.bridge-nf-call-ip6tables = 1
net.bridge.bridge-nf-call-iptables = 1
net.ipv4.ip_forward = 1
EOF
[root@harbor ~]# sysctl -p /etc/sysctl.d/docker.conf
注:
Docker 安装后出现:WARNING: bridge-nf-call-iptables is disabled 的解决办法:
net.bridge.bridge-nf-call-ip6tables = 1
net.bridge.bridge-nf-call-iptables = 1
net.ipv4.ip_forward = 1:
将Linux系统作为路由或者VPN服务就必须要开启IP转发功能。当linux主机有多个网卡时一个网卡收到的信息是否能够传递给其他的网卡 如果设置成1 的话 可以进行数据包转发,可以实现VxLAN 等功能。不开启会导致docker部署应用无法访问。
#重启docker
[root@xianchaomaster1 ~]# systemctl restart docker
[root@xianchaomaster1 ~]# vi etc/docker/daemon.json
{
"registry-mirrors":["https://y8y6vosv.mirror.aliyuncs.com","https://registry.docker-cn.com","https://docker.mirrors.ustc.edu.cn","https://dockerhub.azk8s.cn","http://hub-mirror.c.163.com"]
}
[root@harbor ~]# systemctl daemon-reload
[root@harbor ~]# systemctl restart docker
18.2.4 安装harbor
创建安装目录
[root@harbor ssl]# mkdir /data/install -p
[root@harbor ssl]# cd /data/install/
安装harbor
/data/ssl目录下有如下文件:
ca.key ca.pem ca.srl harbor.csr harbor.key harbor.pem
[root@harbor install]# cd /data/install/
#把harbor的离线包harbor-offline-installer-v2.3.0-rc3.tgz上传到这个目录,离线包在课件里提供了
下载harbor离线包的地址:
https://github.com/goharbor/harbor/releases/
解压:
[root@harbor install]# tar zxvf harbor-offline-installer-v2.3.0-rc3.tgz
[root@harbor install]# cd harbor
[root@harbor harbor]# cp harbor.yml.tmpl harbor.yml
[root@harbor harbor]# vim harbor.yml
修改配置文件:
hostname: harbor
#修改hostname,跟上面签发的证书域名保持一致
#协议用https
certificate: /data/ssl/harbor.pem
private_key: /data/ssl/harbor.key
邮件和ldap不需要配置,在harbor的web界面可以配置
其他配置采用默认即可
修改之后保存退出
注:harbor默认的账号密码:admin/Harbor12345
安装docker-compose
上传课件里的docker-compose-Linux-x86_64文件到harbor机器
[root@harbor harbor]# mv docker-compose-Linux-x86_64.64 /usr/bin/docker-compose
[root@harbor harbor]# chmod +x /usr/bin/docker-compose
注: docker-compose项目是Docker官方的开源项目,负责实现对Docker容器集群的快速编排。Docker-Compose的工程配置文件默认为docker-compose.yml,Docker-Compose运行目录下的必要有一个docker-compose.yml。docker-compose可以管理多个docker实例。
安装harbor需要的离线镜像包docker-harbor-2-3-0.tar.gz在课件,可上传到harbor机器,通过docker load -i解压
[root@harbor install]# docker load -i docker-harbor-2-3-0.tar.gz
[root@harbor install]# cd /data/install/harbor
[root@harbor harbor]# ./install.sh
看到下面内容,说明安装成功:
[Step 5]: starting Harbor ...
Creating network "harbor_harbor" with the default driver
Creating harbor-log ... done
Creating registryctl ... done
Creating harbor-db ... done
Creating redis ... done
Creating registry ... done
Creating harbor-portal ... done
Creating harbor-core ... done
Creating harbor-jobservice ... done
Creating nginx ... done
✔ ----Harbor has been installed and started successfully.----
在自己电脑修改hosts文件
在hosts文件添加如下一行,然后保存即可
192.168.40.181 harbor
扩展:
如何停掉harbor:
[root@harbor harbor]# cd /data/install/harbor
[root@harbor harbor]# docker-compose stop
如何启动harbor:
[root@harbor harbor]# cd /data/install/harbor
[root@harbor harbor]# docker-compose start
如果docker-compose start启动harbor之后,还是访问不了,那就需要重启虚拟机
18.3 Harbor 图像化界面使用说明
在浏览器输入:
接收风险并继续,出现如下界面,说明访问正常
账号:admin
密码:Harbor12345
输入账号密码出现如下:
所有基础镜像都会放在library里面,这是一个公开的镜像仓库
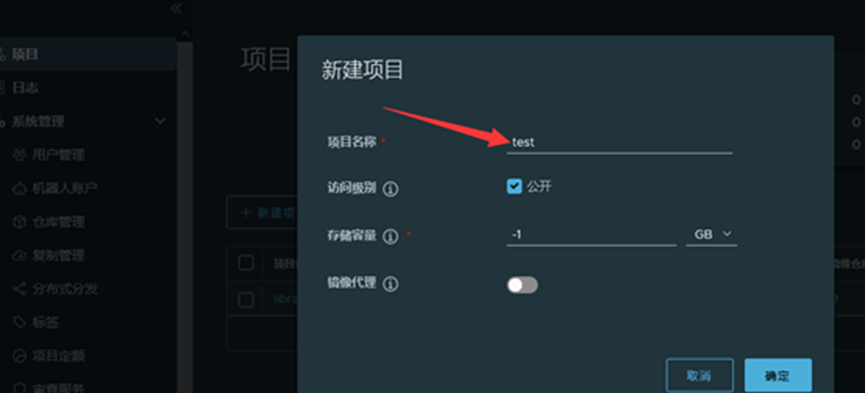
新建项目->起个项目名字test(把访问级别公开那个选中,让项目才可以被公开使用)
18.4 测试使用harbor私有镜像仓库
#修改docker配置
[root@xianchaomaster1 ~]# vim /etc/docker/daemon.json
{ "registry-mirrors": ["https://rsbud4vc.mirror.aliyuncs.com","https://registry.docker-cn.com","https://docker.mirrors.ustc.edu.cn","https://dockerhub.azk8s.cn","http://hub-mirror.c.163.com"],
"insecure-registries": ["192.168.40.181","harbor"]
}
修改配置之后使配置生效:
[root@xianchaomaster1 ~]# systemctl daemon-reload && systemctl restart docker
#查看docker是否启动成功
[root@xianchaomaster1 ~]# systemctl status docker
#显示如下,说明启动成功:
Active: active (running) since Fri … ago
注意:
配置新增加了一行内容如下:
"insecure-registries":["192.168.40.181"],
上面增加的内容表示我们内网访问harbor的时候走的是http,192.168.40.181是安装harbor机器的ip
需要拉取harbor内的镜像文件的时候需要先修改 hosts文件吧 192.168.40.181 harbor 加入进去
登录harbor:
[root@xianchaomaster1]# docker login 192.168.40.181
Username:admin
Password: Harbor12345
输入账号密码之后看到如下,说明登录成功了:
Login Succeeded
演示上传一个docker的镜像,手动拉取tomcat镜像
docker pull tomcat
打包镜像
docker save -o tomcat.tar.gz tomcat
[root@xianchaomaster1 ~]# docker load -i tomcat.tar.gz
#把tomcat镜像打标签,这时候后多出一行192.168.40.181/test/tomcat v1 的镜像,test是harbor里面创建的项目名
[root@xianchaomaster1 ~]# docker tag tomcat:latest 192.168.40.181/test/tomcat:v1

[root@xianchaomaster1 ~]# docker push 192.168.40.181/test/tomcat:v1
执行上面命令就会把192.168.40.181/test/tomcat:v1上传到harbor里的test项目下
18.5 从harbor仓库下载镜像
在xianchaomaster1机器上删除镜像
[root@xianchaomaster1 ~]# docker rmi -f 192.168.40.181/test/tomcat:v1
拉取镜像
[root@xianchaomaster1 ~]#docker pull 192.168.40.181/test/tomcat:v1
如果要做高可用就搭建2个harbor,用复制关系,在加 ke+nginx 服务,使用vip的ip镜像上传,


麦小伦
来看一下